How To Create Website With Django
Django web project consists of applications, and each Django web project can contain multiple applications. This article will tell you how to create and add a Django application to a web project. All the operation is implemented in a virtual environment. Please read How To Install Python Django In Virtual Environment first if you do not know.
1. Example Overview.
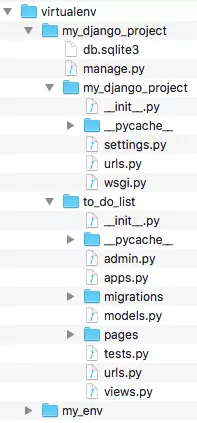
- The working folder in this example is
virtualenv. -
my_envis just one virtual environment folder that I created. - The folder
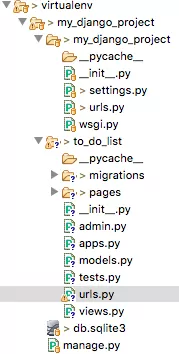
my_django_projectis the Django web project folder, and it contains one project settings foldermy_django_projectand one application folderto_do_list. - The most important files in the folder
my_django_project / my_django_projectaresettings.py( contains the web project configuration settings data, such as template file directory) andurls.py( contains the web project request URL path to each application's urls.py mappings.). - Next, we will tell you how to implement all this step by step.
2. Go Into Python Virtual Environment.
- CD into the working directory.
$cd /Users/....../virtualenv
- Run
source my_env/bin/activateto dive into the virtual environment.$ source my_env/bin/activate
3. Create Django Web Application.
- Run the below command in the Python virtual environment to create
to_do_listapplication.(my_env) 192:my_django_project $ python manage.py startapp to_do_list
- After the above step, the folder
to_do_listis created in the current folder, and the most important files has been added to theto_do_listfolder aremodels.py,urls.pyandviews.py.
4. Define Django Application Model.
4.1 Define App Model.
- The app's
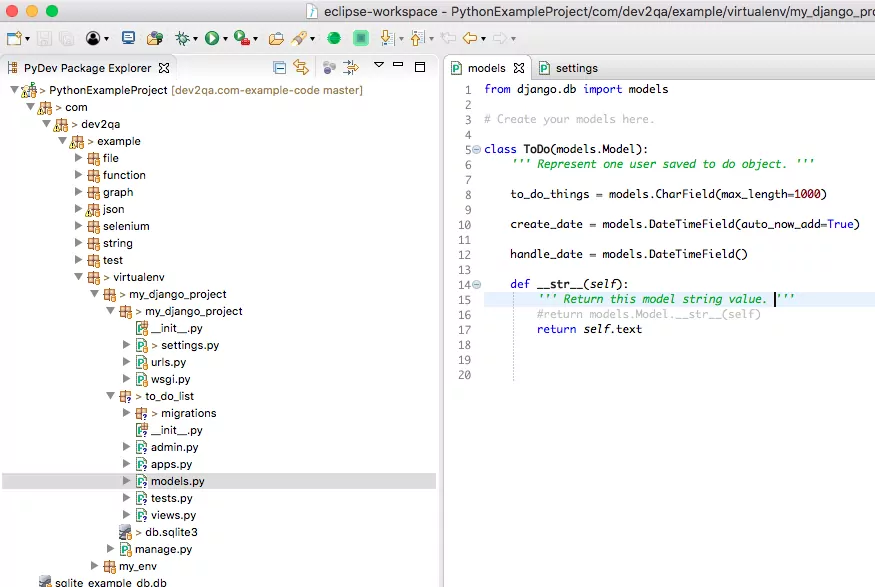
models.pyfile contains all the app model class definitions. A model class is mapped to a database table. And the class attribute map to the table's column. So open themodels.pyfile in an editor and add the below code. For convenience, I use the eclipse PyDev plugin to edit the file, it is simple and efficient. Please read How To Run Python In Eclipse With PyDev to learn more. - models.py
from django.db import models # Create your models here. # This class maps to a table to_do_list_ToDo, the table name start with the app name. class ToDo(models.Model): # Maps to to_do_things table column. to_do_things = models.CharField(max_length=1000) # Maps to create_date table column. create_date = models.DateTimeField(auto_now_add=True) # Maps to handle_date table column. handle_date = models.DateTimeField() def __str__(self): ''' Return this model string value. ''' return self.to_do_things
4.2 Activate App Model.
After creating the app model class, you need to add the to_do_list app in my_django_project/my_django_project/settings.py file to activate the to_do_list app and use the model.
- Open
settings.pyfile. - Add
to_do_listapp inINSTALLED_APPSsection.INSTALLED_APPS = [ 'django.contrib.admin', 'django.contrib.auth', 'django.contrib.contenttypes', 'django.contrib.sessions', 'django.contrib.messages', 'django.contrib.staticfiles', # Below is my app. 'to_do_list', ]
5. Create Django Model Mapped Table In Project SQLite Database.
-
CD into the Django web project folder
virtualenv / my_django_project.$ cd my_django_project
- Create table
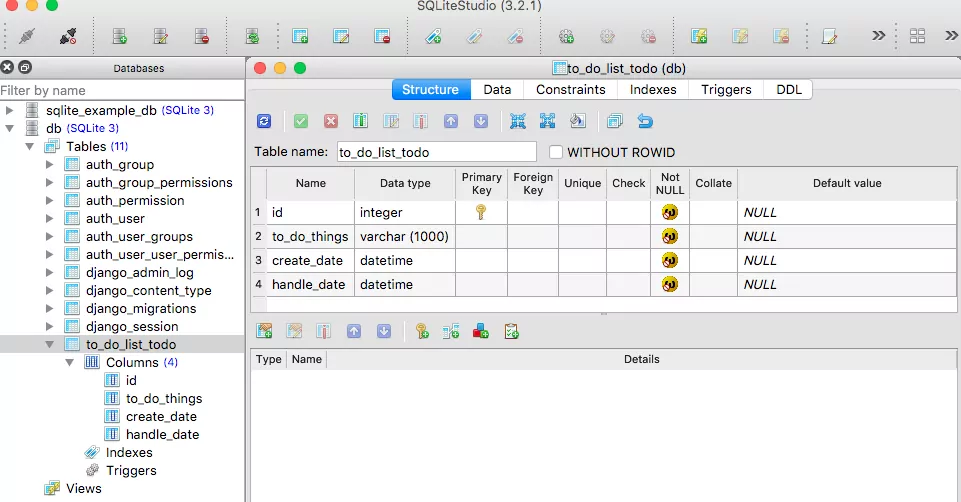
to_do_list_todoinmy_django_projectSQLite database file (my_django_project / db.sqlite3) with following command.(my_env) 192:my_django_project $ python manage.py makemigrations to_do_list Migrations for 'to_do_list': to_do_list/migrations/0001_initial.py - Create model ToDo (my_env) 192:my_django_project $ python manage.py migrate Operations to perform: Apply all migrations: admin, auth, contenttypes, sessions, to_do_list Running migrations: Applying to_do_list.0001_initial... OK
- Use SQLiteStudio to open the
db.sqlite3file, you can see the table has been created. Please read How To Install SQLite3 On Mac to learn how to use SQLite Studio.
6. Register ToDo Model In Django Admin Site.
- Open the file
virtualenv / my_django_project / to_do_list / admin.py, and add the below code to it.from django.contrib import admin # Import the model we defined in models.py. from to_do_list.models import ToDo # Register the ToDo model class to the admin site. admin.site.register(ToDo)
- Now open a browser and browse the admin URL
http://localhost:8000/admin/, there add a new section TO_DO_LIST in the dashboard, you can manage your custom models in this section.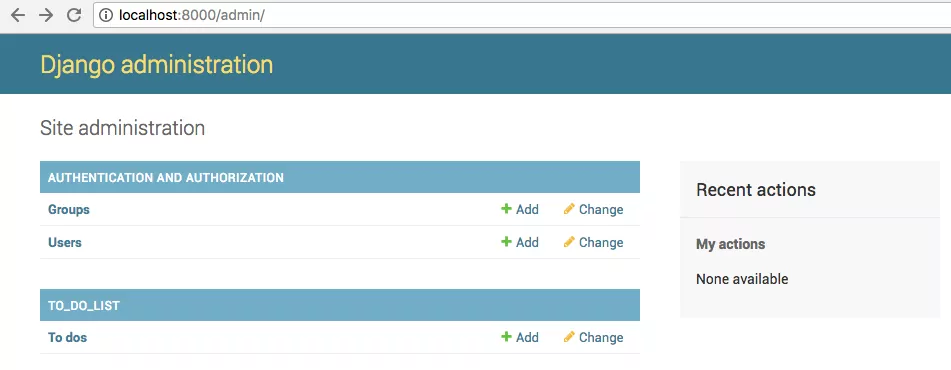
- Click the Add link in the TO_DO_LIST section to add a new ToDo object as below picture.
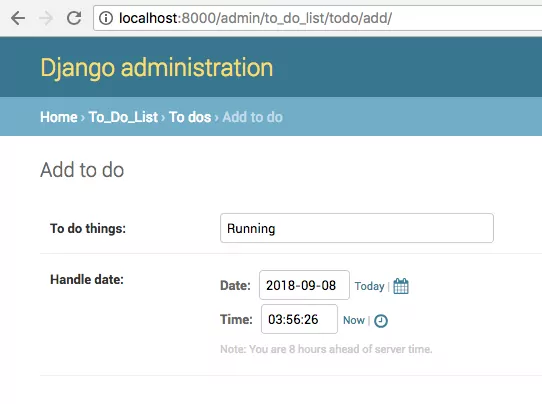
- When you click the Save button, the ToDo object has been added to the list, and the data is also inserted into the SQLite database table to_do_list_todo.
7. Mapping URLs.
When a user requests a url, Django will invoke a related python function predefined in application/views.py ( to_do_list/views.py ) file. There are two urls.py files.
- Web project level
urls.py(my_django_project/my_django_project/urls.py). This file contains the requested url to the applicationurls.pyfile mappings, you can see them in a later chapter. - Application-level
urls.py(my_django_project/to_do_list/urls.py), you should create this file by hand. This file contains url path to view function mappings in this application.
7.1 Create Django Application Url Mapping File.
Create a file urls.py in the to_do_list directory, and input the below code in it. The urlpatterns variable in the below code is a list of page url and python function mapping configuration.
from django.urls import path # import views from local directory. from . import views urlpatterns = [ # When user request home page http://localhost:8000/to_do, it will invoke the home function defined in views.py. path('', views.home, name='home'), # The first parameter is the url path. # The second parameter is the response function defined in views.py file. # The third parameter is the url name which will be used in html file url tag. # For example, in html code {% url 'to_do_list:to_do_list' %} will be mapped to url http://localhost:8000/to_do/list_all path('list_all', views.to_do_list, name='to_do_list'), # <id> is a placeholder that will be replaced with the real record id. path('show_detail/<id>/', views.to_do_detail, name='to_do_detail'), ] 7.2 Add Django App Urls Mapping File In Project Urls Mapping File.
To easily manage different Django app url mappings, we can create url mapping file for each Django app, and then add all those app url mapping files in project url mapping files.
So edit themy_django_project/my_django_project/urls.py file with below content.
from django.contrib import admin from django.urls import include, path from django.conf.urls import url urlpatterns = [ # When request http://localhost:8000/admin/, it will use url mappings defined in admin.site.urls.py file path('admin/', admin.site.urls), # When request http://localhost:8000/to_do, it will use url mappings defined in to_do_list.urls.py file # The include function must contains a tuple and a namespace key value pair. # The tuple first element is the app urls mapping file, the second element is the application name. # If do not provide the application name, it will throw Specifying a namespace in include() without providing an app_name is not supported error. url('^to_do/', include(('to_do_list.urls','to_do_list'), namespace='to_do_list')) ] 8. Define View Function.
Now openvirtualenv/my_django_project/to_do_list/views.py file and input the below code.
from django.shortcuts import render # Import ToDo model class defined in current models.py file. from .models import ToDo import os # Calculate django application execute directory path. PROJECT_PATH = os.path.realpath(os.path.dirname(__file__)) # This function will return and render the home page when url is http://localhost:8000/to_do/. def home(request): # Get the index template file absolute path. index_file_path = PROJECT_PATH + '/pages/home.html' # Return the index file to client. return render(request, index_file_path) # This function will display todos in a list page the request url is http://localhost:8000/to_do/list_all. def to_do_list(request): # Get all todos model object order by handle_date column. todos = ToDo.objects.order_by('handle_date') # Add the todos list in Django context. context = {'todos' : todos} # Get the list page absolute path. to_do_list_file_path = PROJECT_PATH + '/pages/list.html' # Render and return to the list page. return render(request, to_do_list_file_path, context) # Display the todo detail information in web page. The input parameter is todo id. The request url is http://localhost:8000/to_do/show_detail/3/. def to_do_detail(request, id): # Get todo object by id. todo = ToDo.objects.get(id=id) # Set the todo object in context. context = {'todo' : todo} # Get todo detail page absolute file path. to_do_detail_file_path = PROJECT_PATH + '/pages/detail.html' # Return the todo detail page. return render(request, to_do_detail_file_path, context) 9. Create Template Files.
In step 8, you can see some Html files are used in the python function. These Html files are called template files. There are four Html template files in this example. Before introducing them, let us look at a video demo about this example.
There are two navigation links on the example home page, one is the Home Page link, the other is the List To Dos link. When you click the List To Dos link, it will list all the todos links ( includes Eat at morning, Debug the source code, Running ) in the todos list page, when you click the Debug the source code link it will show the todo detail information page.
9.1 base.html
This is the parent template file, other files will inherit from this file. It contains the navigation link and a block content placeholder. So all this file's child template files will contain navigation links.
<!-- The url tag's parameter format is app_name:url_mapping_name(defined in app's urls.py file.) --> <a href="{% url 'to_do_list:home' %}">Home Page</a> <a href="{% url 'to_do_list:to_do_list' %}" style="margin-left:10px">List To Dos</a> <br/><br/> {% block content %}{% endblock content%} 9.2 home.html
<!DOCTYPE html> <html> <head> <meta charset="UTF-8"> <title>Home Page</title> </head> <body> <!-- extends the parent template file --> {% extends "to_do_list/pages/base.html" %} {% block content %} This is the to do list web app home page. {% endblock content%} </body> </html> 9.3 list.html
<!DOCTYPE html> <html> <head> <meta charset="UTF-8"> <title>To Do List Page</title> </head> <body> {% extends "to_do_list/pages/base.html" %} {% block content %} <p>All Todos List</p> <ul> {% for todo in todos %} <li><a href="{% url 'to_do_list:to_do_detail' todo.id %}">{{todo}}</a></li> {% empty %} <li>No todos have been added yet.</li> {% endfor%} </ul> {% endblock content%} </body> </html> 9.4 detail.html
<!DOCTYPE html> <html> <head> <meta charset="UTF-8"> <title>To Do Detail Page</title> </head> <body> {% extends "to_do_list/pages/base.html" %} {% block content %} <p>{{todo.to_do_things}}</p> <ul> <li>Creation Date : {{todo.create_date}}</li> <li>Handle Date : {{todo.handle_date}}</li> </ul> {% endblock content%} </body> </html> 9.5 Fix TemplateDoesNotExist Error.
When you browse the web page in above example, you may meet Template Does Not Exist error like below.
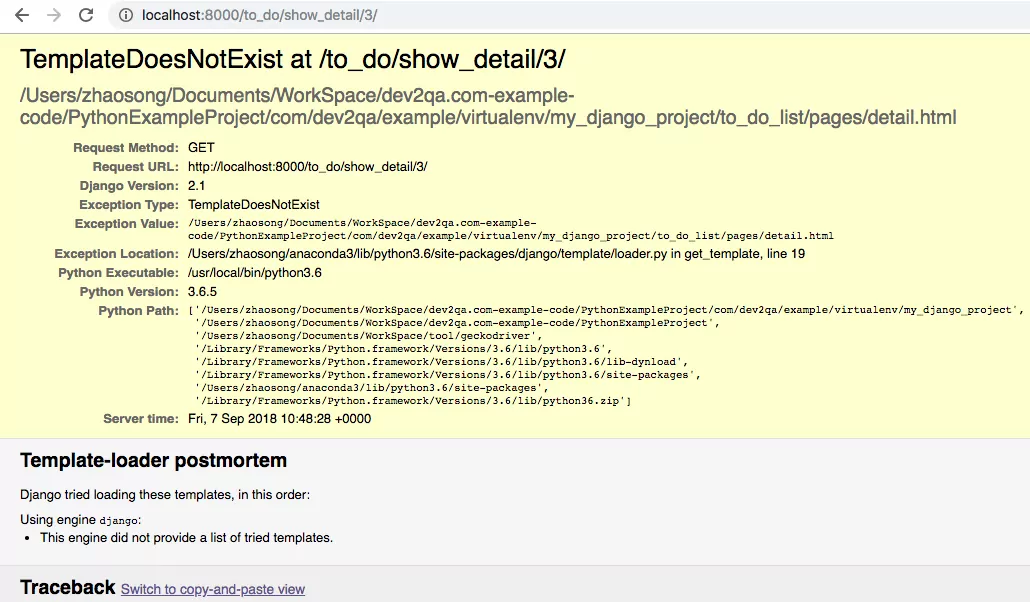
This means Django can not find the template file, because the template directory is not configured correctly inmy_django_project/my_django_project/settings.py file. Follow the below steps to fix it.
- Open
settings.pyfile. - Edit TEMPLATES / DIRS value to either the template file absolute path ( Django will find the template files in this path directly ) or an empty string like below
''( In this case, you need to calculate the project path in theviews.pysource code to get Html template file absolute directory like above section 8).TEMPLATES = [ { 'BACKEND': 'django.template.backends.django.DjangoTemplates', ''' DIRS can contains the absolute template file directory path. 'DIRS': ['/Users/zhaosong/Documents/WorkSpace/dev2qa.com-example-code/PythonExampleProject/com/dev2qa/example/virtualenv/my_django_project/to_do_list'], or the DIRS at least contains one empty string, otherwise the django system will throw TemplateDoesNotExist error. This is a bug of Django code.''' 'DIRS': [''], 'APP_DIRS': True, 'OPTIONS': { 'context_processors': [ 'django.template.context_processors.debug', 'django.template.context_processors.request', 'django.contrib.auth.context_processors.auth', 'django.contrib.messages.context_processors.messages', ], }, }, ] - Now start the Django web server and run the example as in the video.
10. Question & Answer.
10.1 How to save client response data into database table in Django application.
- I have developed a simple web application use Django, but it is very basic. What I need is to get the user response data and save the data to somewhere like a database. I do not know how to do it in the python Django application, can anyone tell me how to do it?
- Django provides built-in models to save client response data to a database table. You can define the Django model follow the instructions in this article, and each model can map to one table in your database, the example uses SQLite database, because Python supports the SQLite database by default, you do not need to install SQLite database python driver module. If you want to use other databases such as MySQL database, you need to install the MySQL database python module, you can read the article How To Connect MySQL Database In Django Project, Python Connect To MySQL Database Example.
10.2 Django TemplateDoesNotExist error occurred on different machines.
- I have two machines, they both installed Ubuntu, Nginx, and Python. The difference is the python version, one uses python 3.7 the other uses python 3.5. And when I request a template Html file in the two Django applications, one machine throws the error message TemplateDoesNotExist but the other does not. I do not know why, maybe there is something wrong with my machine one, but I can not fix it. I had specified the TEMPLATE_DIRS value in the
settings.pyfile. And I am sure the template file exists on both machine and the directory is correct. Below is thesetting.pyfile content.# Get the template file saved path, the template files path is the Django python file saved path. SETTINGS_PATH = os.path.normpath(os.path.dirname(__file__)) TEMPLATE_DIRS = ( os.path.join(SETTINGS_PATH, 'templates'), )
And the above settings should find the template file in a path like /usr/lib/python3.5/site-packages/projectname/templates/appname1/template1.html.
- The TEMPLATE_DIRS settings in your Django project's
settings.pyfile will make Django find the template files inyour-project-directory/templatesfolder. So your settings will find the template file in the path /usr/lib/python3.5/site-packages/projectname/templates/template1.html, so you need to move your template folder under the project folder, not the Django application folder. - You can fix this kind of error by adding your Django app from the beginning. Because maybe there is something wrong with your
settings.pyconfiguration file during the development process. You can follow the below steps. 1. Create your Django app and template file directory under the Django project folder. 2. Add the Django app to the INSTALLED_APPS list value in thesettings.pyfile. 3. Add the Django app's templates directory in thesettings.pyfile TEMPLATES list value.TEMPLATES = [ { ... 'DIRS': [os.path.join(BASE_DIR, 'templates'), os.path.join(BASE_DIR, 'your_django_app_name', 'templates', 'your_django_app_name'), ... ] } ]
How To Create Website With Django
Source: https://www.dev2qa.com/how-to-make-a-website-with-python-and-django/
Posted by: stewartfortalwyneho.blogspot.com

0 Response to "How To Create Website With Django"
Post a Comment