

How To Draw A Reindeer Face Step By Step
Step by Step Guide of How To Describe 3/4 View Face | The Loomis Method | How to Draw Facial Features at 3/4 View | Tips and Reminders
If y'all're looking to take a look back on the key proportions of drawing a face, practise cheque out our previous article - How To Describe A Basic Portrait . It's a footstep-by stride guide to the fundamentals of bones portrait drawing. In that location you will find the very useful proportions for drawing an like shooting fish in a barrel frontal view of the face! It's a good intro before learning how to draw three/4 view face.
TABLE OF CONTENTS: Looking for something in detail? Bound ahead using the links beneath:
What You lot'll Need
The Loomis Method
Placement of face up on your paper
Outlining and dissecting the skull
Laying downward the facial features
Photo Examples of How To Depict 3/four View Face up
Step-by-step Guide of How To Draw three/4 View of the Face
Once y'all accept learned the how tos of bones portrait cartoon, it will be a much smoother transition into learning how to describe 3/4 view confront. I highly encourage you to try this out as many artists still adopt to describe portraits at this angle. Try not to limit yourself to but cartoon a frontal view of faces. It's more challenging but definitely worth it equally it gives you more liberty in your compositions. Here, you will learn how you lot can break downward the seemingly complicated human face into more than manageable smaller parts.
Keep in mind that in that location will be foreshortening especially when the head starts tilting upwards or downwards. Facial features go through varying changes and it'south important to be observant to those changes. I promise that if you merely keep practicing, you'll somewhen become the hang of it. So delight don't be discouraged, each obstacle you overcome is a bang-up accomplishment. Only acquire to be patient with yourself and your progress, give yourself fourth dimension to learn each step. Y'all tin can do it! But before nosotros starting time drawing, permit'due south first assemble and prepare the materials we'll be using.
What You lot'll Demand:
- A handy sketchbook fabricated of good quality paper and high GSM.
- Graphite pencil
- Ruler (optional)
- Kneaded eraser
- Reference photo (optional)
- Good light source (optional)
The Loomis Method
There are many means and methods of how to depict iii/4 view faces, and artists have their own preferences or develop their own methods. I find American illustrator, author, and fine art instructor Andrew Loomis' method comes with very helpful and very clear instructions. And, can really exist used for practically any angle. Let's go ahead and see the step-by-footstep process he has shared to all of the states.
1. Placement of face on your newspaper
First things first, programme out the placement of your subject area's head on your paper. You don't want to finish working on a fully rendered drawing, and then suddenly realizing it looks oddly unbalanced. A skillful composition tin make a huge difference. For a handy guide to creating centre-catching compositions, check out our other Toolkit articles - Gilt Rules of Limerick and Tricks of the Composition Merchandise . Lots of great tips and techniques wait you there!

Okay, now that y'all take the placement down, permit's continue to our next step of cartoon 3/4 view face.
2. Outlining and dissecting the skull
- Draw a circle, this will exist the upper part of the skull. Now, allow's plow that circle into 3D course - into a ball!
- Next, let'southward pierce a pin straight through the ball. This pin will serve every bit the grounding for the centrality. The pin's head stands for the top of our head. That's like shooting fish in a barrel to remember!

- Now you will split the ball in iii sections: the BROWLINE, MIDDLE LINE, and the unlabeled one that divides the head into the front end and back office. The Center LINE is the line that divides the face in one-half, from the hairline directly down to the chin. BROWLINE is the forehead line, it intersects the Centre LINE and the unmarked line which will later be useful for determining the proper ear placement.
- Below y'all can conspicuously come across how the BROWLINE follows the angle of where the head is tilted towards. For instance, when the caput is tilted upwardly, the BROWLINE is curved up. Similarly, when the head is tilted downwardly, it curves downward. This axis-similar function of the pivot is an important starting point on how to amend understand the process of how to draw three/4 view face.

If you accept observed a skull, you lot'll take seen that yes the tops and backs of our heads are rounded, but the sides - where our ears are - are somewhat flatter. This means that nosotros have to slice off the sides of our brawl to replicate this. Usually offset at the same level as the sides of our temples downwards to the base of the ears. Below you will come across that as a smaller circumvolve, with an added cross-section tilted in the same bending equally the tilt of the head. You'll end upward with a shape that looks like a partially flattened ball - like to a cranium.

iii. Laying down the facial features
Take a peek beneath to see how the sliced off parts look similar even though the other side is out of our view, let'due south imagine it anyhow! To be able to invisibly see the subconscious side is an essential function of drawing 3/4 view confront. Next, extend the Centre LINE downwards to marker the lower heart function of the face up down to the chin where you will be aligning your facial features. Then, determine where the hairline is on your bailiwick's face and mark it, this varies from person to person. Dissever the face from the hairline to the chin into 3 equal parts. Beneath, the beginning marking you'll see is for the hairline, followed by BROWLINE for the browline, the third marker for the base of the nose, and finally the last ane for the bottom of the mentum.

A. Ears
- Let's first brand certain nosotros identify the ear on the correct spot, an oddly placed ear can ruin a portrait. The top of the ear is on the same level equally the line for the eyebrows, and the bottom is on the same line every bit the base of operations of the olfactory organ. Use the lines of the bottom right piece found in the smaller circle as your guide. It is colour blocked in green in the drawing in a higher place.
- The C curve of the ear will non follow a vertical line, but is instead angled backwards closely following the curving shape of the back of the head. Ears also differ for each person, and so but written report your reference or model'south ain ears for copying.

B.Eyebrows and Eyes
- Measuring from the pinnacle of the caput to the bottom of the chin, divide the face in half and mark information technology. That one-half mark is where the eyes will exist, this works all-time when drawing 3/4 view face at eye level.
- Depending on the shape of the eyebrows of each private, depict a curving line that aligns with that shape. The tapered end of the right eyebrow is right next to the edge of the smaller circle on the side of the head. While the left 1 is foreshortened and may even be partially subconscious past the span of the olfactory organ, similarly with the left center.

- To help you with the heart placement, marker the bridge of the olfactory organ found at the corners of the eyebrows. Determine the width and the correct angle and connect it to the eyebrows, again this differs from person to person.
- Having determined the inner corner of the eyebrows will assist a lot when drawing the eyes. Brand sure to depict the eyes on the same horizontal line that you lot have already previously adamant to avoid drawing optics at dissimilar levels. Both eyes will have similar curvature.
- Don't draw the right heart'due south corner too shut to the nose. First determine the corner of the middle before drawing the whole eye shape, then you tin all the same easily adjust it as yous run across fit. At this bending, the left eye may be partly covered past the olfactory organ. Drawing optics at 3/iv view tin exist difficult, but it volition get easier as you keep practicing it.
- Draw your irises and pupils depending on where your subject or reference is looking - at the viewer or elsewhere. The eyelids will exist similar to the curvature of the eyes, the thickness will be adamant co-ordinate to each individual'southward own measurements.

C. Neck
- For the neck, draw a cylinder that connects to the skull, imagine a doll'south caput that pops into place when attached to the neck.
- For the placement of the sloping back role of the cervix that connects to the shoulders, utilise the same line as the bottom of the chin equally a mark for the offset of the slope. In the images below, the cylinder is drawn using blueish lines.
- The lines that connect the neck to the shoulders aren't directly out apartment, they slope gently down. But, this also varies as some people take more than sloping shoulders while others take a more hanger-like form.
- Finally, you tin can depict in the collarbones if you wish, though they don't necessarily appear all the time. This depends on the habiliment your reference or model is wearing or drawn in. At any rate, it's always good to know how to describe it just in case.
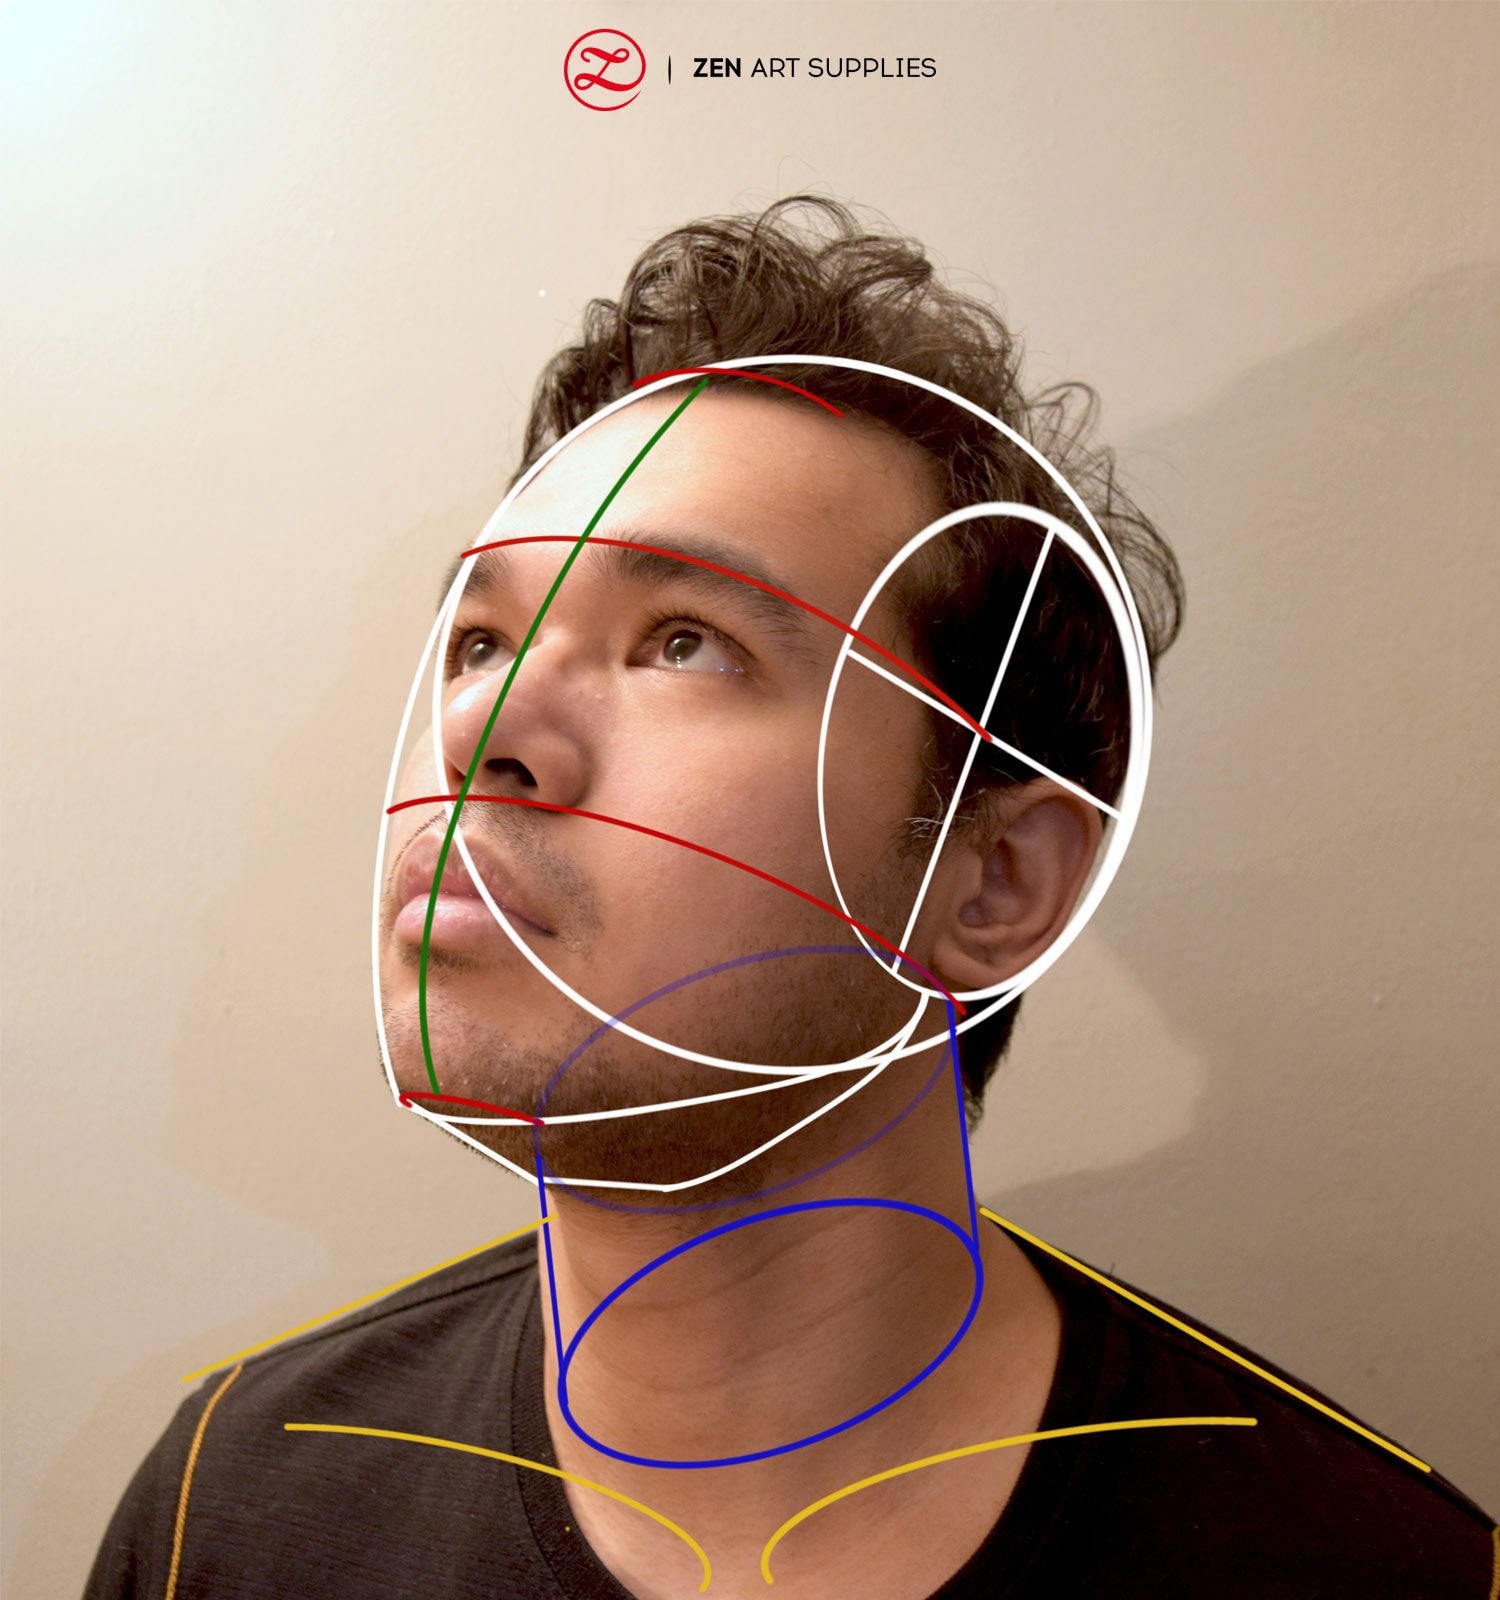
Photo Examples of How To Depict 3/4 View Face
To help you better visualize how to draw iii/4 view face, I overlapped the proportion lines on three photographs too. First with a simple heart-level 3/4 view face, followed by a downward tilting 3/4 view face, and an up tilting three/4 view face up.
Centre-level iii/iv View of the Face

Downward Tilted iii/4 View of the Face

Upwardly Tilted iii/4 View of the Face up
Hither are some reminders that I hope volition help y'all out:
- Have more patience, be kind to yourself, and trust the process. As long as you keep trying and practicing, you'll run across great results in no time.
- Describe your proportion lines and guiding lines lightly, having to erase stubborn unwanted lines later on will be one thing less for you to worry about.
- Be observant to how the face and each feature changes depending on the tilt and bending of the head. Ane single face up tin can vary in a hundred unlike ways, that is the challenge of drawing angled faces. But it gives you more options to choose from.
- The Loomis method of drawing angled faces gives you a neat foundation for all the unlike faces y'all will exist drawing from here on out. It's very flexible and tin can exist easily modified to show specific characteristics such as a wide forehead, a square-ish jaw, broad lips, and other distinct features. So don't be afraid to adapt each feature to lucifer the reference or model'south own individual features. After all, that's what makes each of the states special.
- Try to practice drawing each feature separately also and in varying angles, this way you tin also closely study each role one at a time and how they differ depending on the angle. I still think moaning and groaning when our teacher asked u.s. to draw 30 ears from different angles and of different people. But at present I am sooo grateful that I did those exercises, I will never forget how to describe an ear subsequently that!
Most importantly, have fun and don't forget to celebrate each milestone you lot achieve!
Which angled face up did yous want to draw first? Which angle practice you find the nearly challenging to depict? Do you lot like to use your own face equally your usual reference or do you adopt to have another model to depict from? Let us know what yous retrieve, nosotros'd dear to hear dorsum from you. Feel gratis to leave a comment, and we'll exist happy to answer any queries you accept.
For our next one - Color Meditation - Meditative Painting With Watercolor , practice the art of mindfulness and calm through watercolor meditation exercises. Watch out for it! Until then, keep practicing and accept a bang-up time cartoon!

- MEET THE AUTHOR-

Kathleen is the Wordsmith at ZenART, resident artist and art editor. When God sent a shower of talents, Kathleen made sure she got a basketful of them! She'due south a visual artist with practical knowledge on various fields from painting and sculpture, to costume and gear up design which comes in very handy when writing almost various art techniques and theories. She also shares her passion for the arts through teaching. She runs her own make of handmade wirework jewelry designs.
References:
Loomis, A. (1956). Cartoon the Head and Easily.

Source: https://www.zenartsupplies.co/how-to-draw-3-4-view-face-step-by-step/
Posted by: stewartfortalwyneho.blogspot.com
0 Response to "How To Draw A Reindeer Face Step By Step"
Post a Comment